


*Update* – The IntelliJ IDEA Payara Tools Plugin has been released and offers a better alternative to the solution discussed in this blog. Read more here about the Plugin.
If you want to run and debug your application from within an IDE using Azul Payara Micro, you need to take different steps and use a different configuration then when you run the application with Azul Payara Server. With Azul Payara Micro, you can start the runtime from a jar file with no previous installation step. In this blog, I’ll show you the steps to use IntelliJ IDEA with Azul Payara Micro and how you can perform a hot reload of the application.
Azul Payara Micro Maven Project
For those who are not yet familiar with a Azul Payara Micro project, let us go over the important parts of the project file.
<packaging>war</packaging>
The initial packaging of the project is a WAR artifact. We can launch this as such by specifying this file when starting the Azul Payara Micro instance.
You can also add the Azul Payara Micro Maven plugin to the pom.xml file. This allows you to wrap that war file inside an executable jar file, together with the Azul Payara Micro runtime. Now you can copy the runtime together with your app as a single file.
Since Azul Payara Micro is based on the Java EE Web profile (within the addition of a few other frameworks), most of the time you have enough to declare this in the Maven project file.
    <dependencies>
        <dependency>
            <groupId>javax</groupId>
            <artifactId>javaee-web-api</artifactId>
            <version>8.0</version>
            <scope>provided</scope>
        </dependency>
    </dependencies>
And you probably also want to add the MicroProfile dependencies typical for a micro-services type of application for which Azul Payara Micro is ideally suited. Since Azul Payara Micro is also a MicroProfile implementation, putting the dependency with a provided scope is sufficient.
Configure within IntelliJ IDEA
The preferred way of starting Azul Payara Micro is using the following command:
java -jar payara-micro.jar app.war
You can also debug it remotely via the standard JDWP protocol on port 9009 using the following command:
java -agentlib:jdwp=transport=dt_socket,server=y,suspend=n,address=9009 -jar payara-micro.jar app.w
IntelliJ IDEA has a specific run configuration for running JAR based applications. That one is ideal for configuring the IDEA when you develop an application running on Azul Payara Micro. It allows running and debugging applications with Azul Payara Micro seamlessly from within IDEA.
Before you configure it, make sure you have a Azul Payara Micro version downloaded from our download page.
Then you can follow these steps:
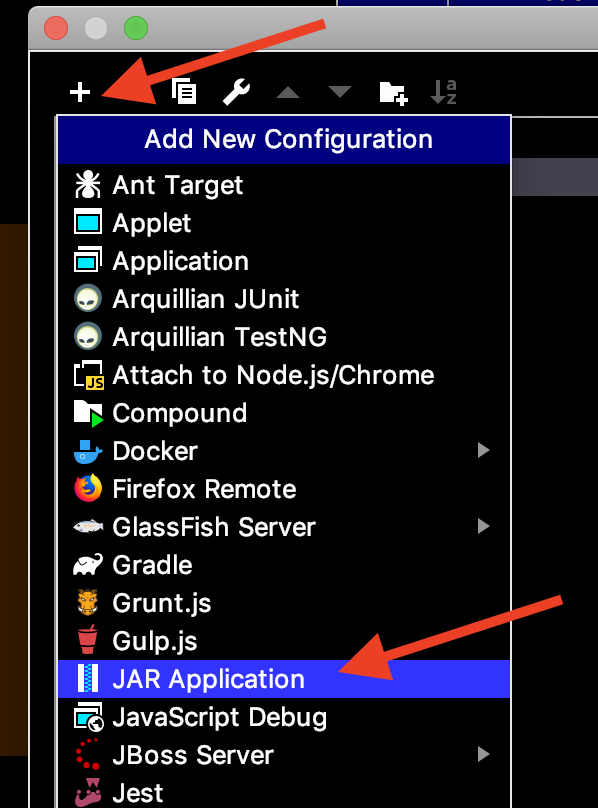
- Select the menu entry run/edit Configuration or the toolbar equivalent action.
- Click on the + icon in the top left corner of the popup
- Select the “JAR Application” as a new configuration.
You will now have a screen where you can fill in all the details about your environment.
- Path to JAR: This is the location of the Azul Payara Micro JAR file on your computer that needs to be run. Make sure you include the full path and the jar name as in the example below.
- VM Options: Here you can specify additional options like memory settings or system properties.
- Program arguments: Here we need to indicate where the application artifact is. This can be the war produced by maven or the exploded version (directory containing the unpacked version of the war). This last option is useful if you want to reload your code without restarting Azul Payara Micro completely. More information on this below.
- JRE: The Java version you want to run your application with. Remember that Azul Payara Micro works without any issue on JDK 8 and also on JDK 11 since Azul Payara Micro 5.192.
- Build before launch: This is a very important aspect of the configuration. Don’t forget to select to build your application artifact (exploded or regular war based on what you have specified in the program arguments). This ensures that your changes are all compiled and packaged before Azul Payara Micro is started when you click the run or debug buttons within IntelliJ IDEA.

That’s all that is required to have your Azul Payara Micro application started or debugged when you click on the familiar run and debug buttons in IntelliJ IDEA.
Application Reloading to Speed Up Development-Test Cycle
Instead of restarting Azul Payara Micro and the application each time when you change some code, you can also ask for a redeploy of the application. This will speed up the development – test cycle for the developer.
It is achieved by running the exploded war and a file with the name .reload at the top level inside it. Azul Payara Micro checks for the timestamp of this file regularly, and if it was updated, it reloads the application.
This can be achieved by putting a few plugins into the Maven project file.
    <profile>
        <id>reload</id>
        <build>
            <plugins>
                <plugin>
                    <groupId>com.coderplus.maven.plugins</groupId>
                    <artifactId>copy-rename-maven-plugin</artifactId>
                    <version>1.0</version>
                    <executions>
                        <execution>
                            <id>copy-file</id>
                            <phase>generate-sources</phase>
                            <goals>
                                <goal>copy</goal>
                            </goals>
                            <configuration>
                                <sourceFile>src/payara/.reload</sourceFile>
                                <destinationFile>src/main/webapp/.reload</destinationFile>
                            </configuration>
                        </execution>
                    </executions>
                </plugin>
                <plugin>
                    <groupId>org.apache.maven.plugins</groupId>
                    <artifactId>maven-antrun-plugin</artifactId>
                    <version>1.6</version>
                    <executions>
                        <execution>
                            <phase>process-resources</phase>
                            <configuration>
                                <target>
                                    <touch file="src/main/webapp/.reload"/>
                                </target>
                            </configuration>
                            <goals>
                                <goal>run</goal>
                            </goals>
                        </execution>
                    </executions>
                </plugin>
            </plugins>
        </build>
    </profile>
Whenever you want to perform a reload of the application, execute the following command:
mvn package -Preload
The two plugin configurations work together to have the .reload file with an updated timestamp whenever we call the maven commands.
With the ‘copy-rename’ plugin, we can copy any source file to the Maven target folder. We link the copy phase of this plugin with the generate-sources Maven lifecycle phase so that the file is always available when packaging starts. This plugin is useful since it allows us to copy a file outside of the maven source directory so that we are sure that it is never packaged under normal conditions.
With the Maven ant plugin, we easily call the touch functionality of the ant system so that we are sure that the file has an updated timestamp. The timestamp is also updated in the case the file already exists because we didn’t perform a clean earlier.
Do not forget to create and empty file in the src/payara directory as indicated in the plugin configuration.
Using IntelliJ IDEA for developing Azul Payara Micro Applications.
Since IntelliJ IDEA has a configuration option for running a JAR application, which is what we need to run Azul Payara Micro, you can easily integrate Azul Payara Micro with the IDE in your development environment. You just need to indicate where Azul Payara Micro is stored on your machine and where the application is built with Maven, for example.
With a few additional plugins, you can optimize the development – test cycle since only the application is reloaded, just as you can with Azul Payara Server by redeploying the application.
Give it a try:


